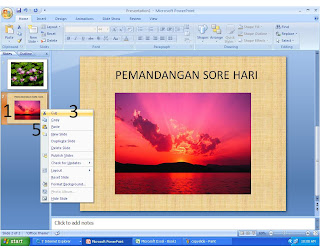
Very easy to move the slide that we have made, namely:
1. Click on the slide will be moved
2. Click the right mouse
3. Click the "cut" with the scissors
4. Place the cursor at the place where the slide will be moved, and press the right mouse
5. Click "Paste"
For more details, see pictures, Oke ...
To create a text arranged into several columns in newspapers as we can do the following manner:
1. Selection of text that we will make the field
2. Click the "column" in the group "paragraph" (It's in the home ribbon)
3. Akan show some amount of menu options in the fields you want, if you want outside of the column click more
4. Type the desired number of columns in the "number" and the menu settings spasinya "spacing"
5. Click OK.
Now we will insert a table. The steps to do it are:
1. Click the ribbon insert
2. Click the table
3. Select the boxes corresponding to the row and column that we want.
Or by clicking to insert table
4. In the insert table dialog box, type the number of columns in the row "Number of columns"
5. For the number of line number when the line "Number of rows"
6. Click "OK"
Your table will be successfully inserted in the slide
Buy / Read more »
To insert images in a our slide presentation , can be done in a way:
1. Click the ribbon insert
2. On Illustration group, click Picture
3. Appear when insert picture dialog box, locate the position where the image is saved with move down arrow on the line "Look In"
4. Click on the picture that we will insert
5. Click Insert
Pictures are now into our slide show
Buy / Read more »
For erase powerpoint file is almost same way with change presentation. The different is when in step 6, we click "rename", but for erase we click "delete". For clearly, we do this step :
1. Direct pointer to the key to start the bottom left corner
2. Click the right mouse
3. Click "Explore"
4. Folder on the left column, find the folder where we keep the presentation
5. After the presentation file is found, click the right mouse
6. Click "delete"
7. When display " Are you sure you want to remove ...", you can click "yes", if you want to erase , but if you don't sure to erase you can click "No"


After we save powerpoint presentation, we must know how to open a file or to call back at any time that presentation file we need, how we do it ?
The way is, usually we have to first enter the program powerpoint, after entering the program, do the following:
1. Click the button microsoft office
2. Click "Open"
3. Find the folder where the file, we save the presentation by pressing the arrow keys on the bottom line "in the file"
4. Click "Files that we are open"
5. Click "Open

Occasionally, at the same time we membuak more than one program, so we want to close the powerpoint presentation that we make.
To do so, there are three option buttons on the top-right corner of the display powerpoint namely:
1. X (Close) to close powerpoint application
2. Restore down: which view powerpoint
3. inimize: Hide powerpoint program that we created in the taskbar (the desktop).
We recommend that before doing this, make sure that our powerpoint presentation is our first store

When you first open the powerpoint, presentation we will automatically be given a name by 1 presentation powerpoint program.
If you do not want to change the file name or the presentation, click the Microsoft Office button, then click save, after a display such as the below arise do:
1. In the line save in , by pressing the arrow keys down, set would be placed where we make a presentation before
2. In the file name, if you want to change the name of the presentation, change the file name / presentation that is easy to remember our
3. Click save, to execute the presentation so that we saved

Tags : Saving presentation file powerpoint 2007
After we signed in powerpoint program, we will automatically get a slide blank / empty inside. However, if you want to open a new presentation you can do step below :
1. click the Microsoft Office
2. click New
3. select blank presentation
4. Create
For more detail, when you do step wbove you can find display like this :

Tags : Powerpoint 2007 tutorial, create new presentation
To start powerpoint program , do as the following:

1. Click the Start button at the bottom left corner of the desktop
2. Click the program
3. Click the Microsoft office
4. Click Ms. Powerpoint 2007
Tags : start up powerpoint 2007
Powerpoint 2007 have layout like below :

Function of each of the components above, namely:
* Microsoft office button: the button that contains the menus associated with the execution of Fila presentation, such as: open the Fila / Open, save the file / Save, and others
* Tittle bar: powerpoint file name that we are open, or we make now.
When you first open the application powerpoint, tittle bar will automatically give the name of the presentation / file name as our presentation 1
* Slide Pane: Displays the slide-slide has been created
* Place holder: As a place where we can enter text in it
* Slide number: contains information that is on the slide and the total number of slides created
* Zoom slider: Works to zoom in or out of the slide show
Here is i give you free template powerpoint from soniacoleman.com

For download all template above click here
Here is free template for you from powerbacks.com

Do you like template above,
click here to download to your computer
A great way to complete their PowerPoint presentation, is by printing pamphlets for their audience. For example, if you are teaching a class that could give their students copies of the slides that you can write and post-mortem. You can also print notes to yourself that you can see, while presenting her show.
To print the slides, go to the menu bar and select [File - Print] or use the shortcut [Control + P]. You get the typical print menu where you can change the options such as printer, variety and number of copies. However, there are some additional options that are specific to PowerPoint ...

What can you print?
There are a couple of different types of leaves you can print:
Slides: This prints all the slides on a single sheet of paper. This is only useful for printing slides clear transparency for the use of an overhead projector sheets.
Leaves: The most useful, is likely to use. This mode allows you to print perfect replicas of the slides. You can specify the number of slides per sheet, and place up to 9 slides per page (and save a lot of paper). If you select 3 slides, an area lined appear next to each slide that students can write notes on. It should also mark the "framework slide box for each slide that has a black line around it.
Outline: This prints the entire text of his presentation in an abstract format. It looks nice but does not include images.
Notes: This print sheets with their personal notes at the bottom.
PowerPoint 2002 now allows you to preview before printing their brochures, so I recommend using the preview button print-often as you experiment with these types of printing. If you want to make many copies, I recommend the setting of white and black. This will be better in a laser printer and copier well.
It has created its first powerpoint presentation. Has chosen an attractive model, a good source of colors, and has even added some pictures. Now, how do you show your presentation to others?
If you are submitting only a handful of people, you can always show your presentation on your computer / laptop 's control, by itself. Just show a preview pressing [F5] and give your presentation, navigation, slide to slide by clicking the left and right arrow keys

Look at a projector
If you have access to a projector, you can show your output to your portable projector. Most laptops have an external port for connecting an external monitor (or projector). The projector has a monitor cable that connects directly to this port.
After the monitor / projector is connected, you need to tell your computer to send its video output to external projector. Each laptop manufacturer has a different method to turn the external monitor, so you need to read the manual or figure out the symbols drawn on your keyboard. In my Sony Vaio Type I [Fn + F7] to switch between my LCD and the external monitor.
Once your video is out for the external monitor and you can see the desktop on the big screen, you can start your presentation, go to [Presentation - View Show] or write [F5]. His presentation will be full screen.
When finished, press [escape] to stop the presentation, and then you can switch between the external monitor back.
Before concluding our discussion on the images into PowerPoint, I would like to show how the addition of pictures and graphics to show we can rapidly inflate our presentation of the file size. Sizes of large files can make your presentation and potentially unwieldy "one-share."
This is what I mean:
When you save your presentation, PowerPoint saves the sample in an independent. "Ppt" file on your computer's hard drive. Este. Ppt (PowerPoint) file contains, embedded within it, everything on his show, including:
1. Templates used (including background images, fonts, etc.).
2. Text written in the presentation
3. Graphics and photos on the slides.
(There are some things that are not included in the file. Ppt file, such as video and sound, but let's ignore them for now.)
Normally, a simple PowerPoint file takes up very little space on your hard disk. A presentation of 25 pages, with the template and 25 pages of text, can only occupy the space of 150K. That's small enough to fit on a diskette or by e-mail to a friend.
Add photos to your presentation, and everything changed! The same presentation, with only 10 pictures in it, may result in a 3 or whooping 3000K "megas" file! This PowerPoint file definitely does not fit on a floppy disk and should not be sent by electronic mail (ISP Your friend can not allow this large attachments).
When given the presentation with many photos, it is not uncommon to create presentations very large, sometimes 50 to 100 megabytes in size. Go ahead, PowerPoint can handle the big shows. However, if you want to transfer or distribute copies of these large exhibitions, will have to burn. Ppt file to a CD or use an external hard drive.
Buy / Read more »
A really useful feature in PowerPoint is the ability to create text labels at the top of your photos. It's easy to do this, but many people do not use this technique because they do not realize that you are available! Let's try it. After placing an image on the slide, draw a box on top of it.
You can draw a box in two ways:
1. Go to the File menu and select [Insert - Text Box]
2. Select the text box from the bottom of the drawing toolbar


Position the box in place over the photo and Typen as you want. When you preview your presentation in full screen, you see the text laying on top of the image. Woohoo! This is really great, and allows tagging pictures, diagrams ... whatever you want
Layer OrderNow, here's an important point to keep in mind. PowerPoint provides articles on different layers. When placing an object on another object, such as placing a text box at the top of the image, the text, which is in front of the photo.

This is important because sometimes our objects obscured objects. For example, if our box was sitting behind the photo, I do not see at all! Fortunately, we can send items back and forth to make them more visible. To do so, just select the object, right-click on it and select [Order - Bring to Front] or [Send to Back] to move the object in view.
You can find more useful PowerPoint tips-and-tricks like this one at www.mightycoach.com - they even have an online-video course that teaches you to use PowerPoint in only a few hours!